Lian-Li PC-Q08B Aluminum Mini Tower PC Case
Since Zotac launched the first mini-ITX H55 motherboard I've been seeking for a decent PC case for my new HTPC system. For almost 1 year I've tried 4 different solutions including Cooler Master, Thermaltake & Antec, but none of them support a decent GPU, which means I'm stuck with integrated or low-end graphic solutions. That would be enough if I just wanted to watch HD movies and online videos, but as a gamer I want the ability to play some games from time to time without being deceived with a poor performance system.
Luckily we've got a pair of offers in the market giving us compatibility for full-sized GPUs. One of them is the Silverstone SG-07 Mini ITX case, and of course the second one is the PC-Q08 from Lian-Li. The PC-Q08 bundles some interesting features making it very attractive; including 6 bays for 3.5" HDDs/SSDs, 1 bay for 2.5" HDDs/SSDs, 2 full sized PCI slots for a high-end GPU and a pair of fans to improve cooling. The PC-Q08 even includes a motherboard tray and USB 3.0 ports. All that paired with a nice-look and a fairly decent price make the Lian-Li PC-Q08 a case to consider for our next HTPC.

Lian-Li is known for making very nice looking styles, and including high-quality aluminum for every case they ship, avoiding users to get hurt while building their PCs and enjoying the experience at the same time. Hopefully, I'll also enjoy the experience of building and using the PC-Q08. Since many users want to build mini-ITX/micro-ATX PCs to avoid suffering and pain when going to a LAN, this time I made an exception and went to a LAN with the PC-Q08 (and a full-tower case) so I could share my experience with our readers. Benchmark Reviews will start with Lian-Li's features and specifications.
The Lian Li PC-Q08 case comes in three different colors: Silver, Red and Black. The sample we received from Lian Li is the PC-Q08B, which means it's black anodized aluminum, and it'll be the one you'll see in the next sections in our review.

Manufacturer: Lian Li Industrial Co., LTD
Product Name: Mini-Q PC-Q08
Model Number: PC-Q08B
Price As Tested: Available from NewEgg for $119.99 in Black, Silver, and Red.
Full disclosure: The product used in this review was supplied by Lian-Li.
Mini-Q PC-Q08 Features
- Standard PC Components
- USB 3.0 Multi-media I/O ports
- Case Stand: Four aluminum pegs to increase airflow beneath the case
- Two full size PCI Slots
- Thermal Flow: One 140mm LED fan (front) and one 120mm fan (top) keep hot air from damaging you hardware
- Six 3.5" and one 2.5" drive bays
- Standard ATX PS/2 PSU (supports PSU with 120mm cooling fan)
- 300mm Maximum Video Card Size (When HDD cage is removed)
- 5.25" drive bay
PC-Q08 Specifications
- Dimensions (mm): 227 x 345 x 272
- Material: Aluminium
- Available colours: Black (reviewed), silver, red
- Weight: 2.73kg
- Front panel: 2 x USB 3, stereo, mic, power and reset buttons
- Drive Bays: External: 1x 5.25in. Internal: 6x 3.25in, 1x 2.5in
- Form Factor(s):mini-ITX
- Cooling: 1 x 140mm front fan mount (fan supplied), 1 x 120mm roof fan mount (fan supplied)
- CPU cooler clearance 100mm
- Graphics card dimensions supported 300mm long, dual slot, full height
Features and specifications provided by Lian-Li Co.
Now that we're done with features and specifications let's move to the next section where I'll give you a closer look to the exterior and interior details.
Closer Look: PC-Q08 Exterior
Once you open the box you'll find the PC-Q08 case and a box with accessories inside of it. Make sure you open it and identify everything before starting to build your HTPC. Lian-Li includes a plastic bag with lots of screws for different purposes. Extra screws are provided to ensure availability. They also include a PCI bracket cover for USB 3.0 cables (I'll explain this later) and a USB 3.0 to USB 2.0 adapter. Finally, there's the HDD cage support that replaces the lower chamber when installing a long GPU.

Going straight to the case, Lian-Li opted for a squared-form with rounded edges design. It actually looks like a small fridge, but it's elegant enough to place it at the middle of your living room. Notice how all the panels have got holes for ventilation in different places. The PC-Q08 was planned for some real hot components.

The rear reveals a full mesh with holes for ventilation too, but lacking of a fan which we normally find in many cases. As it's visible, the PSU is placed just in front of the motherboard limiting our CPU from enjoying Full-Tower heat-sinks. The PSU won't hinder GPU installation though...

At the bottom we have 4 rubber-stands to avoid slipping and protecting the case from getting scratched on rough surfaces. Again, Lian-Li includes a lot of holes for proper ventilation. Those are specially aimed for HDDs and the GPU.

There's a 120mm black fan at the top to exhaust hot air from the CPU. I think a second fan at the top, or following the holes trend in the rest of the top panel would have been OK too. If you still want a high-end cooling solution for you CPU, you're always able to install an all-in-one water cooling solution like the Corsair H50 or the Coolit ECO.

In the next section Benchmark Reviews gives a detailed look at the external features of the Lian-Li PC-Q08.
PC-Q08 Detailed Exterior Features
Many "aluminum" cases these days are only partially aluminum, with substantial amounts of steel and plastic in addition to the aluminum. This is understandable: aluminum costs more than steel or plastic. This is not one of those cases. With the exception of a few tiny bits (steel thumbscrews, plastic internal cables, etc.) the entire case is aluminum. All of the aluminum is "grained" in the same direction and has the same texture, matching perfectly. Lian-Li also includes rounded edges to achieve an elegant design for the PC-Q08.

The front panel includes a power and a reset button, both back-lighted by blue LEDs. Below we have a pair of USB 3.0 ports and HD audio plugs for speakers/headphones and microphone. Lian-Li "forgot" to include Fire-wire ports, but that's something many people won't miss.

Once I removed the side panel, I discovered some scratches at the internal part of it. I quickly discovered my sample had the 140mm (front) fan uninstalled and jumping freely inside of the case, which probably was the source of the scratches. Actually, I found several others inside my sample, but I hope this to be an exception and not something you'll find on every PC-Q08 shipped.

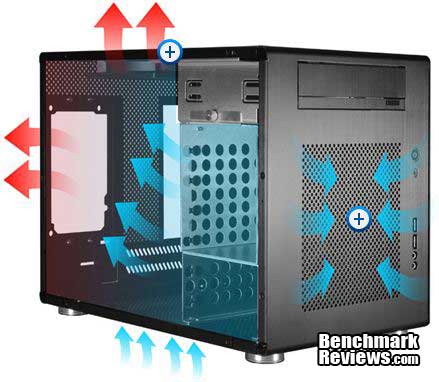
Here's a picture showing how air-flow works inside the PC-Q08. Basically, it's the same as 90% of the rest of the cases at the market. Cold air enters by the 140mm fan and all the holes at the bottom of the case. Heat is removed from HDDs/SSDs, GPU, CPU, RAM and all other hot components and finally it's being exhausted at the rear (holes) and at the top by the 120mm fan. There's an additional exhaust point which is the PSU. When installed, it will also take hot air from the CPU area and exhaust it to the rear.
In the next section Benchmark Reviews gives you a closer look to the interior of the PC-Q08. Follow us there.
Closer Look: PC-Q08 Interior
For being a mini-ITX case, the interior is pretty big. There's space for a 5.25" optical drive, a 2.5" storage drive, and 6 slots for 3.5" storage drives. Both HDD chambers can be removed to increase internal space and make installation easier.

The right side of the case works as a panel, but also as a motherboard tray. This is a nice feature but also means you won't have any extra space between the motherboard and the side panel to hide cables, and that's a very wanted feature nowadays.

Here's a closer look to the fan at the top. Both fans can be connected via 3-pin headers to the motherboard, but include a 3-pin to molex adapter in case of being necessary.

Once we remove all the HDD cages we can have a closer look to the front panel cables. While the power/reset cables are the same we see on each case, the USB 3.0 cables are quite thick and difficult to hide/manage. Everything else is just fine.

You might have been wondering how Lian-Li could add USB 3.0 support. That's a difficult thing to do as many motherboards don't include headers for it, and the ones including USB 3.0 headers for frontal ports are limited to their own front panels. Lian-Li implemented a very simple yet bulk solution including USB 3.0 extension cables. That means you need those cables to reach your own USB 3.0 ports at the I/O area of your motherboard. I'm saying it's a bulk solution because then you need to pass the cable extensions through the case and get them out again by a PCI slot (that's why they included a different PCI cover in the accessories box). If you still want to get functional USB 2.0 ports at the front, Lian-Li includes a USB 3.0 to USB 2.0 adapter, but since it seems I have very bad luck with Lian-Li they shipped a non-functional adapter. As you can see in the next photo, the adapter comes with USB male connectors instead of female ones. That means I can't use the adapters and my sample simply won't have functional USB ports at the front panel. There's no need to worry because all other samples shipped for reviews (and users) have female adapters. I'm sure this is a particular case.

Taking off the HDD cages is quite simple. For the cage at the middle, just take off one screw and pull it gently. The lower chamber needs better support, so you'll need to take off 4 screws at the bottom to take it off.

In the next page, Benchmark Reviews gives a detailed look to the internal features of the Lian-Li PC-Q08.
PC-Q08 Detailed Interior Features
It's nice to see Lian-Li didn't forget 2.5" drives users. Just below of the optical drive, there's space for a 2.5" drive, which can be perfect for a SSD. If you want to fit more drives, you'll need to use 3.5" to 2.5" adapters though. I think Lian-Li could have worked something else and added space for one more 2.5" drive, but at least it's better than not having it.

Installing HDDs is a very easy procedure. Just slip them through the HDD chamber and add 4 screws. All of the mounting points are covered with rubber to decrease vibrations and noise.

Here's a closer shoot to the 140mm fan. It consumes 1.68 watts and it's fairly silent but still provides decent air-flow for our internal components.

The 140mm LED fan includes a dust filter which comes completely attached to it. It's a clever idea and you can always remove it to clean it. Anyway, the best part is that the whole (fan/filter) structure can be attached directly on the case with 4 screws covered with rubber, making installation fast and easy for anyone.

Finally, here's a quick shot to the PSU bracket. You should remove the bracket (4 thumb-screws) and install your PSU on it first, then you can just slide your PSU into the case and put the screws again. You might want to think about your PSU orientation though. If you're using a 120mm fan PSU, you can install it similar to the next photo, which means it'll take cold air from the outside thanks to the side panel holes, or you can install it the other way to increase internal air-flow and take some heat from the CPU area.

Here's a photo with everything uninstalled and removed (except the upper bay for optical drives). Basically this is the whole structure of the case, and it feels pretty solid, so don't worry about it getting bend or whatever.

Now that we've detailed all the internal and external features, let's build a system inside the chassis and see how it looks.
Building a Mini Tower System
The included installation manual is more than enough to discover how to build a system inside the PC-Q08. There are no confusing parts or anything difficult while doing it. The first step is installing the motherboard on the motherboard's tray.

Now you need to mount the side panel into the chassis. Check out how much space do we have at this moment; a lot! You might also want to connect your front panel/USB cables to the motherboard at this moment before installing anything else.

The next step is to install HDD cages. Since I only use a pair of hard drives I decided to take off the lower cage and make space for mounting my MSI GTX 460 1GB Cyclone GPU. I still have space for 6 drives (5 SSDs/HDDs and 1 optical drive). Since the Zotac H55ITX-C-E comes with 6 S-ATA ports, it would be useless to have more drive bays. Other mini-ITX motherboards bundle 4 S-ATA ports only, so the PC-Q08 comes more than prepared for any motherboard.
There are some limitations while mounting your PSU. Depending on the orientation the 24-pin cable could be a little bit annoying. Also, you won't be able to install a super-large 1000 watts PSU, but it's very unlikely to happen since most mini-ITX systems will consume less than 300 watts and you can't build an SLI/CFX system either. In a particular case with a Core i5 655K, 4GB of RAM and the GTX 460 1GB GPU, the system consumed around 230 watts while playing Star Craft 2. I mounted my 600 watts PSU and it's more than enough.

Here's a final shot at the system already installed and ready to work. It wasn't that difficult to make the installation, but I can't say it was easy neither. Actually there's no mini-ITX chassis easy to install because cable management is normally poor and there's close to no space to manipulate, hide or pass the cables, so I can't really complain there. Additionally, can you notice my fingerprints at the front of the PC-Q08? It's very difficult to keep this case clean and without fingerprints.
Here's how your system would look from behind. Notice the space between the I/O panel and the PSU? That's the space you have for a CPU heat-sink. That means you'll need to acquire a low-profile cooler or remain stuck with the stock heat-sink.

Now that we've installed a system, let's head to the final thoughts and conclusions on the next page...
Mini Tower Final Thoughts
It's been a pleasure to build a system into the PC-Q08 Aluminum case. For the first time, I feel like my mini-ITX system will have enough space and will be enough ventilated even at overclocked conditions. That's something you can't have with other mini-ITX cases, and it's something to thank for. However, there are some minor things I'd like to note before jumping to the conclusions. There was a little problem with my sample, and I'm not sure if it's particularly related to this chassis or if all of them are being shipped like that. My problem actually was related to the PSU installation. It was very difficult to make the PSU bracket match its holes after installing the PSU. I tried both orientations without success, and my PSU got scratched in the process. Since this is a non-expensive PSU, I don't care that much, but if it were my 800+ watts super-expensive PSU, I would be very mad at Lian-Li's engineers.
My second problem was explained before, where I got USB male adapters instead of female adapters, and so I finished with non-functional frontal USB ports. I think that's all I can complain about, because everything else was a comfortable experience. Right now, I'll probably left my HTPC inside the PC-Q08, because it feels very solid and well ventilated. My CPU temperatures varied between 25 degrees (idle) and up to 40 degrees at full load. I was concerned about the GPU, but temperatures remained below 70 degrees all the time.

Lian-Li PC-Q08B Conclusion
The performance of the Lian-Li PC-Q08 is very good. From all the ITX cases I've tested up to this date (December 2010), this one has got the best features like 7 drive bays, full 300mm GPU compatibility and 2 big fans to improve ventilation. If there was something to complain about, it has been already said in the final thoughts section. The PC-Q08 actually had better GPU temperatures than my big Corsair Obsidian 700D full-tower case, thanks to its 140mm front fan and all the holes to increase at the bottom.
Appearance is a very subjective matter. If you like simple and elegant cases, this one is for you. You wouldn't notice the PC-Q08 if it wasn't just because of the LED fan and the LEDs at the power/reset buttons. The rubber feet look good and keep the case in its place. I can't complain about not having a side panel window because the PSU stands right there, covering all the motherboard and making a side panel window un-useful.
Lian-Li's quality is one of the best. I always love to say: you haven't tried a high-quality case until you've tried Lian-Li. The brushed aluminum, the rounded edges, and the overall look are just impressive. Back in the days of 2005, I'd have taken a Lian-Li over any other case. Luckily, for all us buyers and PC enthusiasts there are many other high-quality cases nowadays, but Lian-Li keeps their name high with super-quality products.
Functionality is something you'll thank in this mini case. It's got some unique features you don't see in other ITX cases. First of all, it has space for a 300mm GPU. You can also install six 3.5" drives and a 2.5" drive. It supports standard ATX PS/2 PSUs and it's got very decent ventilation for a mini-ITX system. Compared to other mini-ITX cases, I think the PC-Q08 is a real winner
Available from NewEgg for $119.99 in Black, Silver, and Red, this is an expensive computer case for an ITX system. Other cases cost between $50-$90 USD, but they don't offer the same quality or performance. Given the features included with the product, I think you couldn't expect a lower price at the moment. If you really want to build a powerful HTPC, this case is right for your needs, especially because of the 300mm GPU support. Except for the little bugs explained across the final thoughts, I find this case very interesting, and it's a great choice to build your new HTPC. I'd like to watch it lowering its price to somewhere around $100-$110 USD though.
Pros:
+ Elegant and sleek design for great aesthetics
+ LED fan and buttons to give it a nice touch in the night
+ Room for six 3.5" SSDs/HDDs and a 2.5" drive
+ Excellent build quality and quiet 140mm/120mm fans included
+ 300mm GPU compatibility
+ Side panel works as motherboard tray
+ Full ATX PS/2 PSU support
+ Removable hard drive cages to increase space and improve airflow
+ Holes in all the panels to improve air-flow and exhaust heat
+ High-Quality feet to avoid undesired movement
+ Light and easy to carry for LANs
Cons:
- PSU installation is a little bit difficult
- PSU location limits CPU-heat-sink's size
- Price is a little high against other ITX cases
- No side windowed panel
- USB adapters didn't work (particular case for this sample)
Ratings:
- Performance: 9.50
- Appearance: 9.25
- Construction: 9.75
- Functionality: 9.00
- Value: 7.50
Final Score: 9.0 out of 10.
Excellence Achievement: Benchmark Reviews Golden Tachometer Award.
Benchmark Reviews encourages you to leave comments (below), or ask questions and join the discussion in our Forum.
Related Articles:
|


Comments
Don't get me wrong, it's great that the modding community started the whole trend of cramming desktop-level components into Mini-ITX builds and now manufacturers are catering to this niche market, but to focus your product range entirely on this?
The Q07 was too big because of the full-sized PSU and optical drive (yet could only fit a single-slot graphics card, so what's the point in a full-sized PSU). Now the Q08 is even bigger, and the Q11 is about the same size.
Oh and it being Lian Li the price is too much - the Q08 on its own is only about £15 less then a Sugo SG05-450, and that comes with a 450W 80Plus Bronze PSU (which is powerful enough to run any graphics card that can actually fit inside).
Silverstone got it right with the SG05/06 and event though the SG07 is pushing it a bit, it's still an obviously Mini-ITX case and about the right size.
The GPU goes right below the PSU, so imagine the GTX 460 I showed in the picture with the PSU installed. And as long as the GPU measures 300mm long or less, it will be able to be installed.
I mentioned larger PSUs might have problems with the HDD cage at the middle, but you can remove it and still install 2 x 3.5" HDDs. I don't think many people will install a 1000 watts super-large PSU on this chassis. A 600 watts PSU should be fine for any GPU.